Week 16: 9 May
Final at 8 am on Tuesday. Forecast is for clear skies. Turn in your assignment 4.
Then we'll measure the spectral optical depth of the atmosphere.
This measurement is easy and profound.
Notes on how we'll do the measurements (review).
Here is our website used to get Rayleigh optical depth. (source code is here).
Week 15: 2 May
We will continue to work on Assignment 4 in class, bringing it to an awesome conclusion.
Finish up any missing measurements, and work on extra credit if so inclined.
See the assignment for a revision of how to do the extra credit (in short, add it to your report for assignment 4 rather than as a presentation).
Final day: May 10th at 8 am. Assignment 4 due then.
Week 14: 25 April
We will continue to work on Assignment 4 in class.
We will work with the pressure sensor this week.
Here is example pressure sensor evaluation code to use to getting data from this sensor.
We'll need to measure the pressure sensor output as well as the Arduino power supply, the latter using a voltage divider.
Write up that section of the lab you complete each day to make the overall lab write up much easier.
Arrive early to class if possible, to get started with the measurements.
Suggestions: Take photographs with your phone of your circuits to use in your write up (if you have a phone with a camera.)
For those parts where you develop code, save the code and use it in your report as well.
Here is a procedure you can use in general to make sure that your board layout isn't going to have obvious problems when powered up.
1. Don't plug in the Arduino at first.
2. Wire up your breadboard for your experiment.
3. Measure the resistance where the power would go for your circuit. If the resistance is very low, you probably have a short circuit.
4. Repair your circuit and retest it.
5. When satisfied, plug the Arduino in to the USB port.
6. This doesn't guarantee your circuit will work, but it will prevent you from having one that will definitely not work.
See Week 12 for more details.
Extra lab time for this assignment is available:
Where:
Room 113 of Leifson Physics (My office is RM 213 if 113 is not open).
When:
Tuesday and Thursday after class until 1 pm.
Wednesday from 1 pm to 3 pm (normal office hours).
Other times as needed.
Week 13: 17 April
Arrive early to class if possible, to get started with the measurements.
Suggestions: Take photographs with your phone of your circuits to use in your write up (if you have a phone with a camera.)
For those parts where you develop code, save the code and use it in your report as well.
We will go over a procedure you can use in general to make sure that your board layout isn't going to have obvious problems when powered up.
1. Don't plug in the Arduino at first.
2. Wire up your breadboard for your experiment.
3. Measure the resistance where the power would go for your circuit. If the resistance is very low, you probably have a short circuit.
4. Repair your circuit and retest it.
5. When satisfied, plug the Arduino in to the USB port.
6. This doesn't guarantee your circuit will work, but it will prevent you from having one that will definitely not work.
We will continue to work on Assignment 4 in class. Everyone should have photocell time constant measurements accomplished and
should be working now on the TMP36 temperature sensor.
Here is example temperature sensor evaluation code to use to getting data from this sensor.
Write up that section of the lab you complete each day to make the overall lab write up much easier.
See Week 12 for more details.
You can make progress on Assignment 4 as homework.
Download the Arduino software (see link below under "Software").
You can look at the code for various examples, or from the kit (see "Software" below).
Then to make sense of the code, refer to the language reference on the Arduino site.
Extra lab time for this assignment is available:
Where:
Room 113 of Leifson Physics (My office is RM 213 if 113 is not open).
When:
Tuesday and Thursday after class until 1 pm.
Wednesday from 1 pm to 3 pm (normal office hours).
Other times as needed.
Note the pin assignments for the TMP36.
TMP36 temperature sensor pins. Vs is the 5 volt supply of the Arduino. Vout should go to A0 pin on the Arduino.
Week 12: 11 April
Temperature evaluation code.
You can make progress on Assignment 4 as homework.
Download the Arduino software (see link below under "Software").
You can look at the code for various examples, or from the kit (see "Software" below).
Then to make sense of the code, refer to the language reference on the Arduino site.
Bring questions to class. We will go over a programming example together on Tuesday for problem 2.
Extra lab time for this assignment is available:
Where:
Room 113 of Leifson Physics (My office is RM 213 if 113 is not open).
When:
Tuesday and Thursday after class until 1 pm.
Wednesday from 1 pm to 3 pm (normal office hours).
Other times as needed.
Assignment 4 has been posted.
Since we will need to set up the Arduinos and electronic kits, please arrive to class a little early if possible.
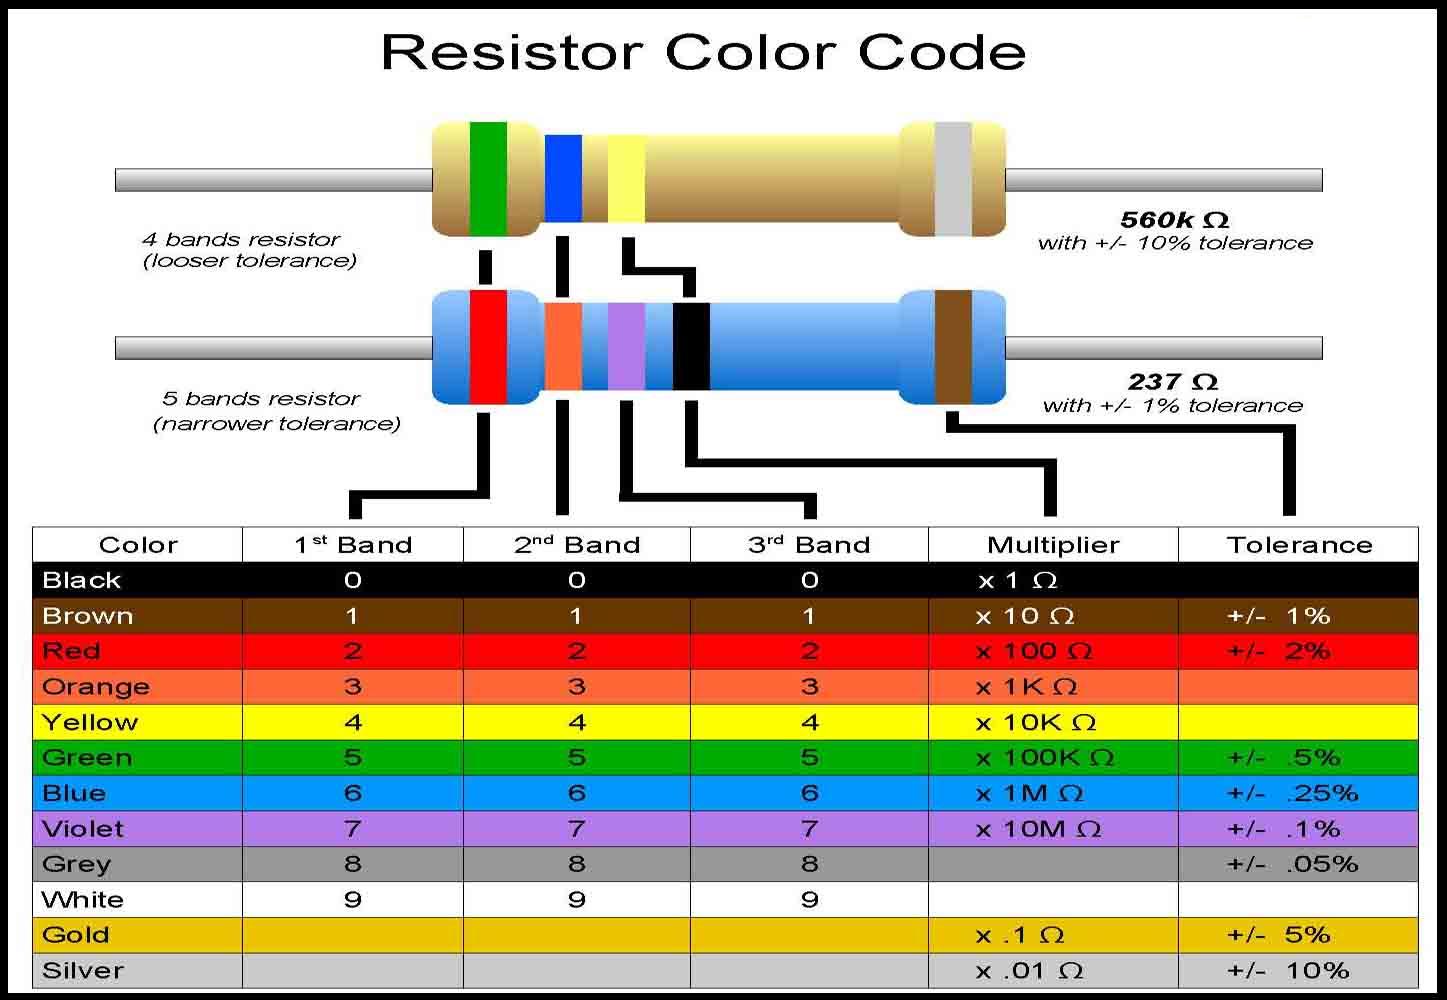
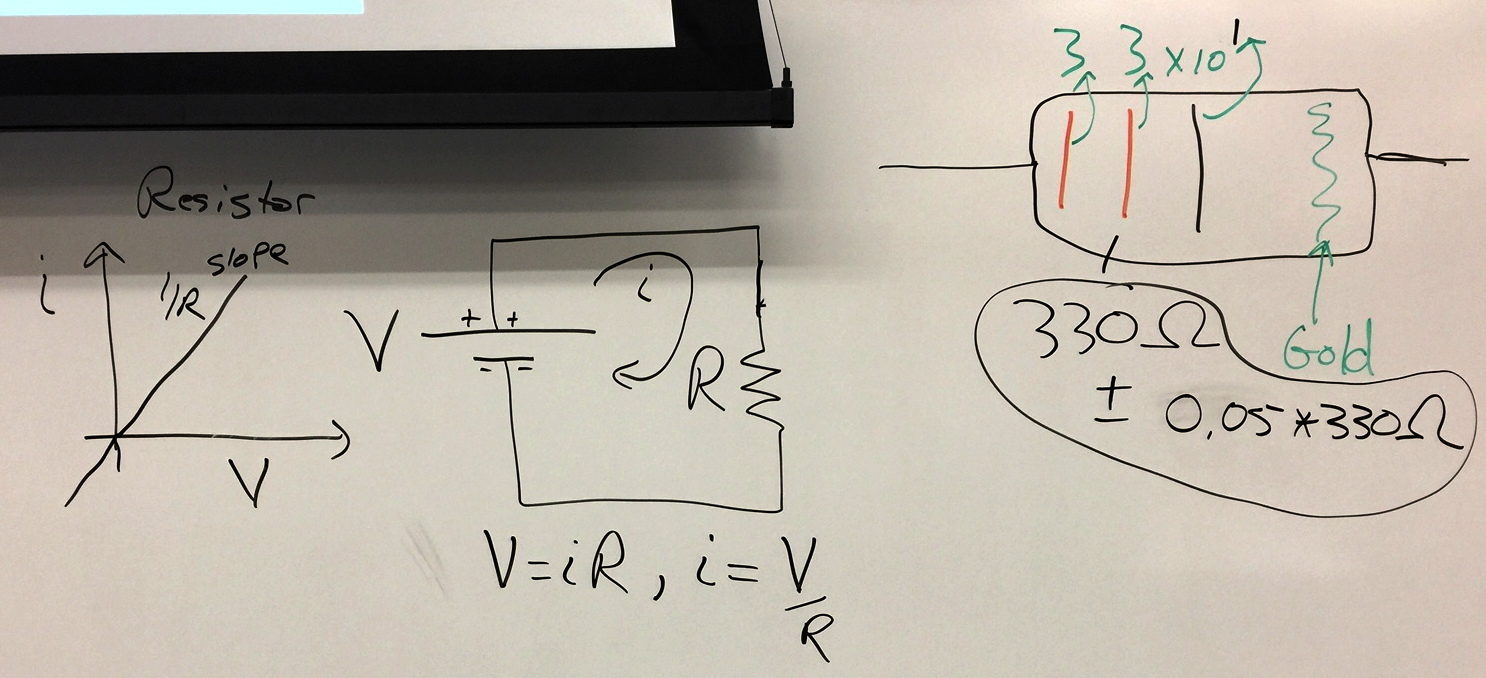
We have start working with the Arduino microcontroller to investigate how to make our own measurement with various sensors.
We introduced "breadboarding" for electical components and sensors, discussed the volt/ohm meter operation,
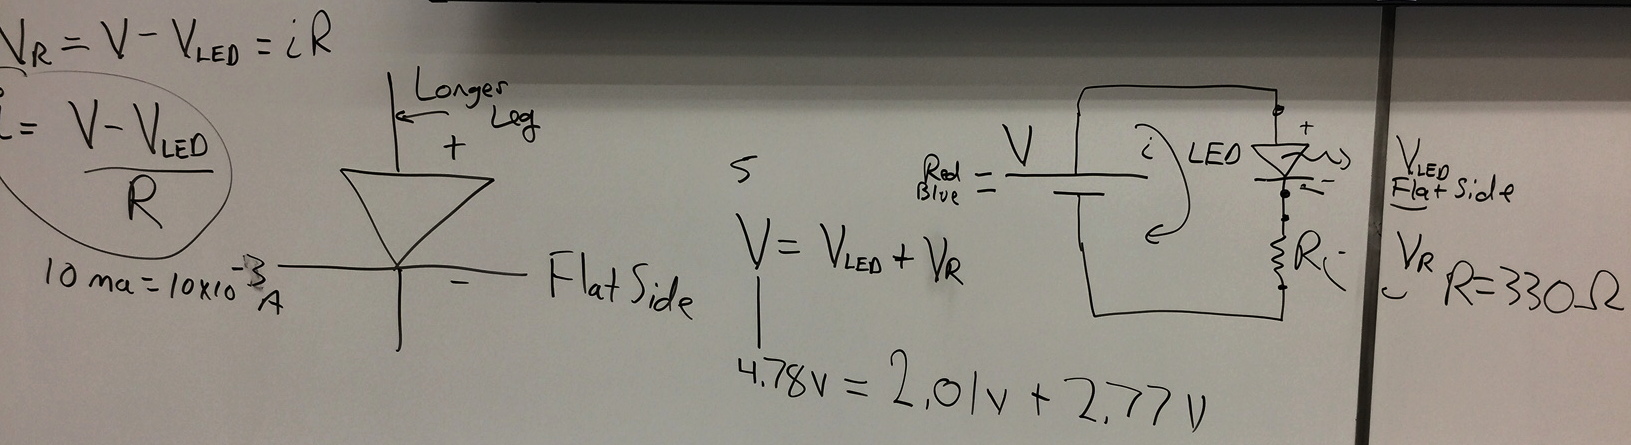
and set up a basic LED circuit.
You can bring your own laptop to class for this lab (we'll also have the software on the room machines).
Software:
Download the Arduino software. (Download the daily build for the computers in DMS106; can run the program from the download folder.)
Cool term software for reading data from the Arduino.
Here's the Arduino sketches (programs) for the kit we'll use in class.
Week 11: 4 April
Assignment 4 has been posted.
Since we will need to set up the Arduinos and electronic kits, please arrive to class a little early if possible.
We have start working with the Arduino microcontroller to investigate how to make our own measurement with various sensors.
We introduced "breadboarding" for electical components and sensors, discussed the volt/ohm meter operation,
and set up a basic LED circuit.
You can bring your own laptop to class for this lab (we'll also have the software on the room machines).
Software:
Download the Arduino software. (Download the daily build for the computers in DMS106; can run the program from the download folder.)
Cool term software for reading data from the Arduino.
Here's the Arduino sketches (programs) for the kit we'll use in class.
Related information
 |
 |
 |
Notes from class on 1 April 2016.
Week 10: 28 March
I have office hours from 1 to 3 on Wednesday, and can meet at other times if that doesn't work,
if you want to talk about the assignment, get help. We will start working with the next project on Thursday.
Assignment 3 is due on Thursday. Bring questions to class on Tuesday.
We'll start working with the Arduino microcontroller to investigate how to make our own measurement with various sensors.
You can bring your own laptop to class for this lab (we'll also have the software on the room machines).
Software:
Download the Arduino software. (Download the daily build for the computers in DMS106; can run the program from the download folder.)
Cool term software for reading data from the Arduino.
Here's the Arduino sketches (programs) for the kit we'll use in class.
Week 9: 14 March
Notes from class on Thursday, summary of assignment 3 graphs. (click on images for larger version).
 |
 |
Notes from class on Tuesday. (click on images for larger version).
 |
 |
 |
 |
We will continue to do measurements of the vertical distribution of temperature, dewpoint temperature, and pressure,
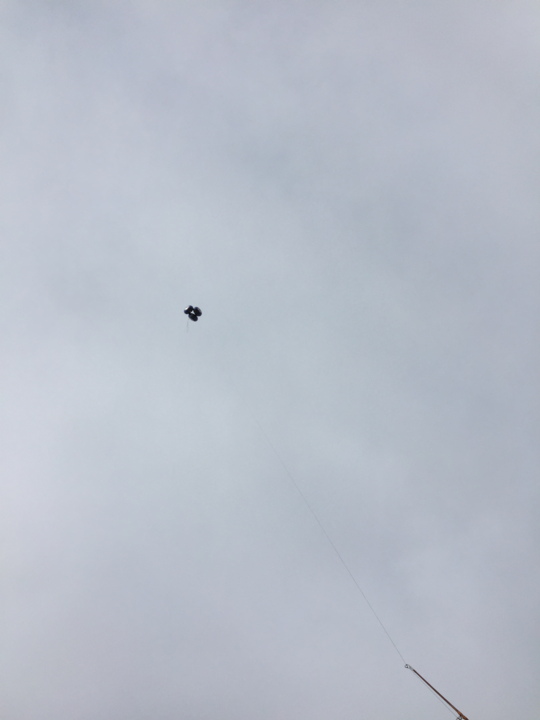
both inside the DMS building, and outside using a tethered balloon sampler.
We accomplished the tethered balloon sampling in week 7, and the data for the assignment is posted there.
Week we worked with the inside measurements. Week 9 we will finish the analysis.
You may use the DRI station pressure to see if the pressure was actually 'constant' during the time of our measurements on 8 March 2016.
Stair measurements started at about 16:47:50 UTC, and peaked at 17:15:40 UTC.

Here are the pressure, temperature, and relative humidity measurements Additional pressure and temperature measurements were |
Measurements from the first balloon launches. Measurements from the second balloon launches. Measurements from the third balloon launch. |
| Choose ONE Teensy card measurement from the above list for Assignment 3. You don't have to analyze them all. |
Choose one balloon flight to analyze. You don't have to analyze them all. |
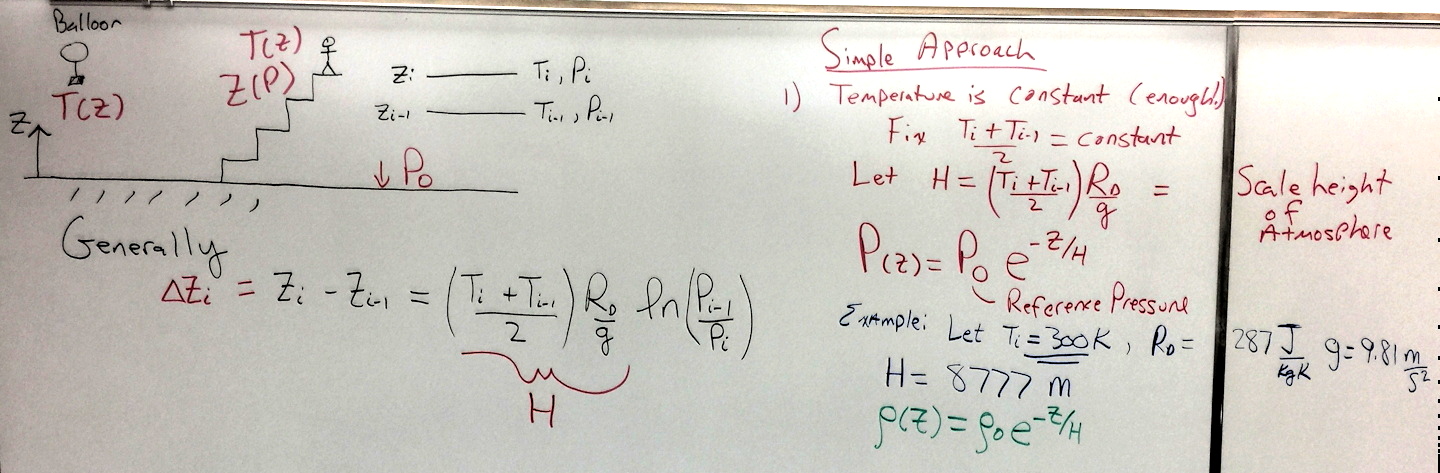
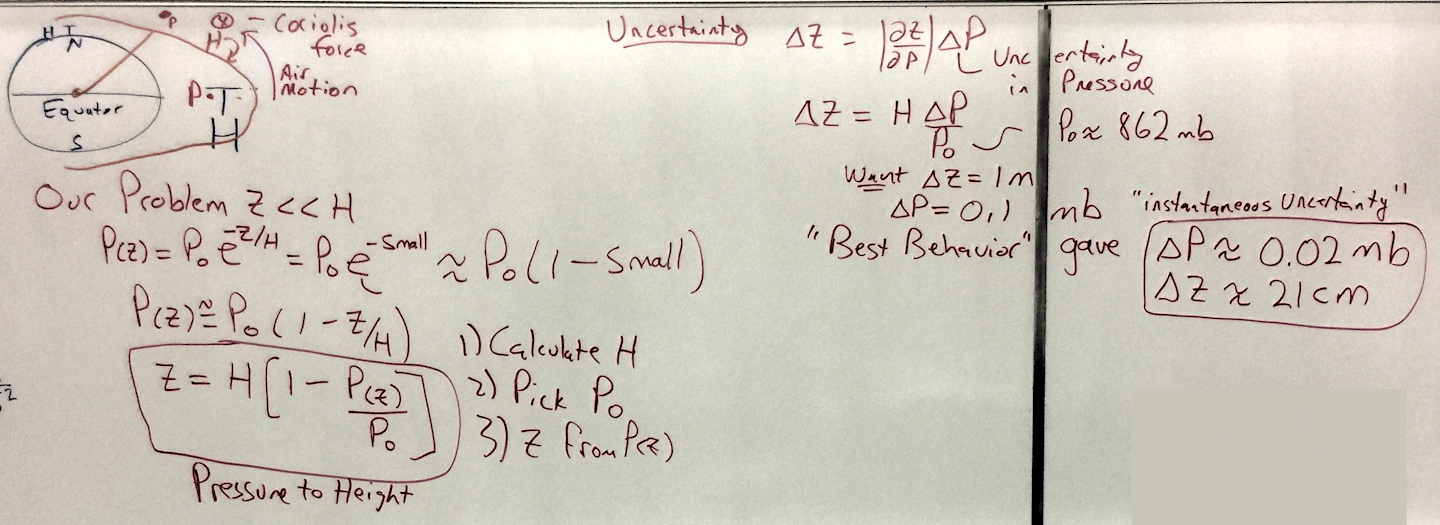
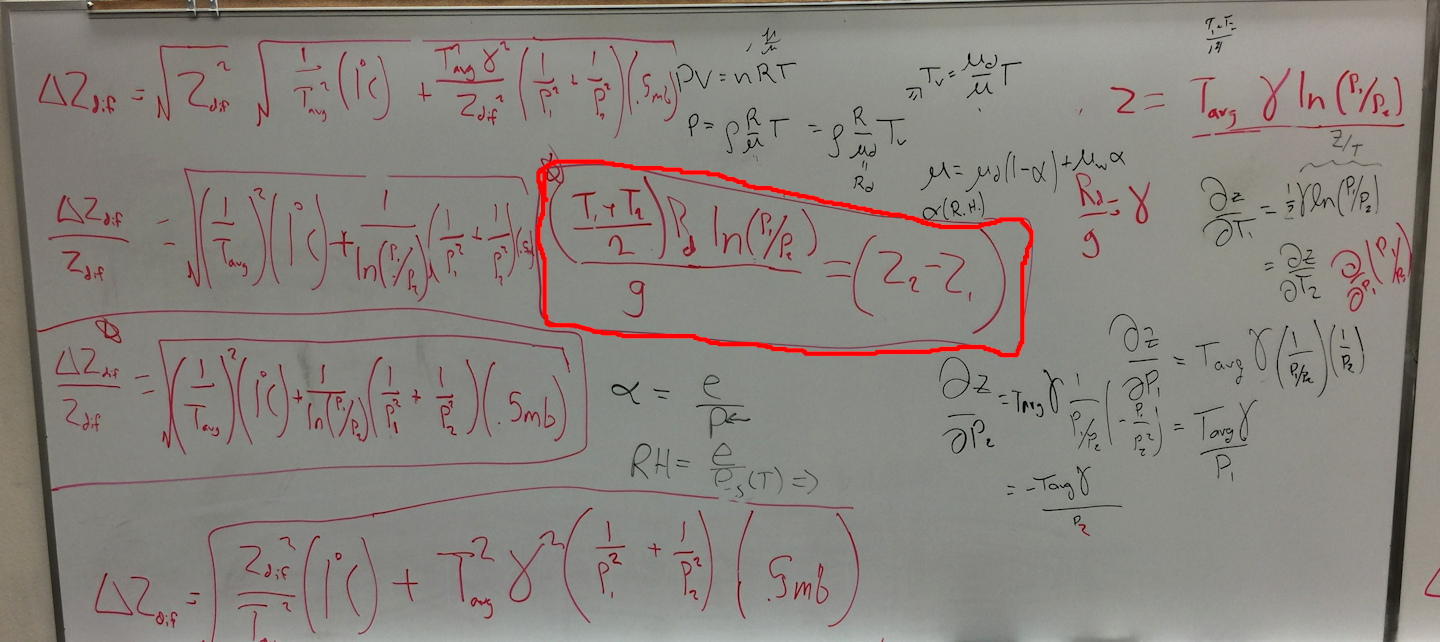
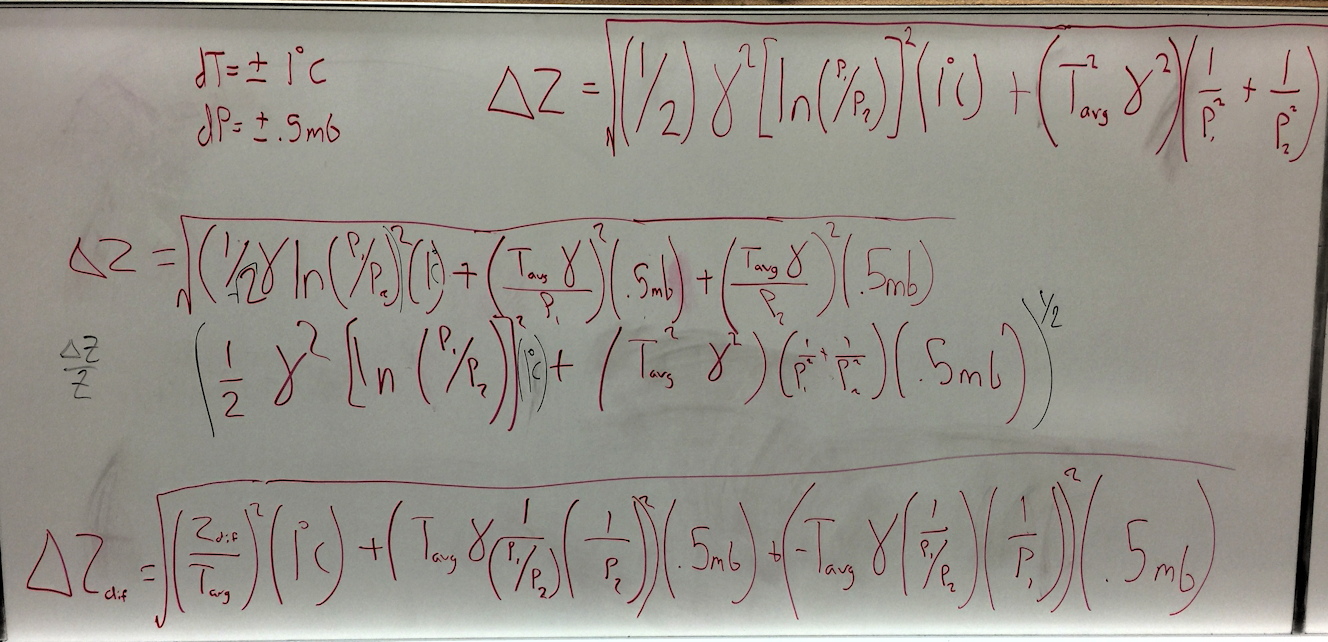
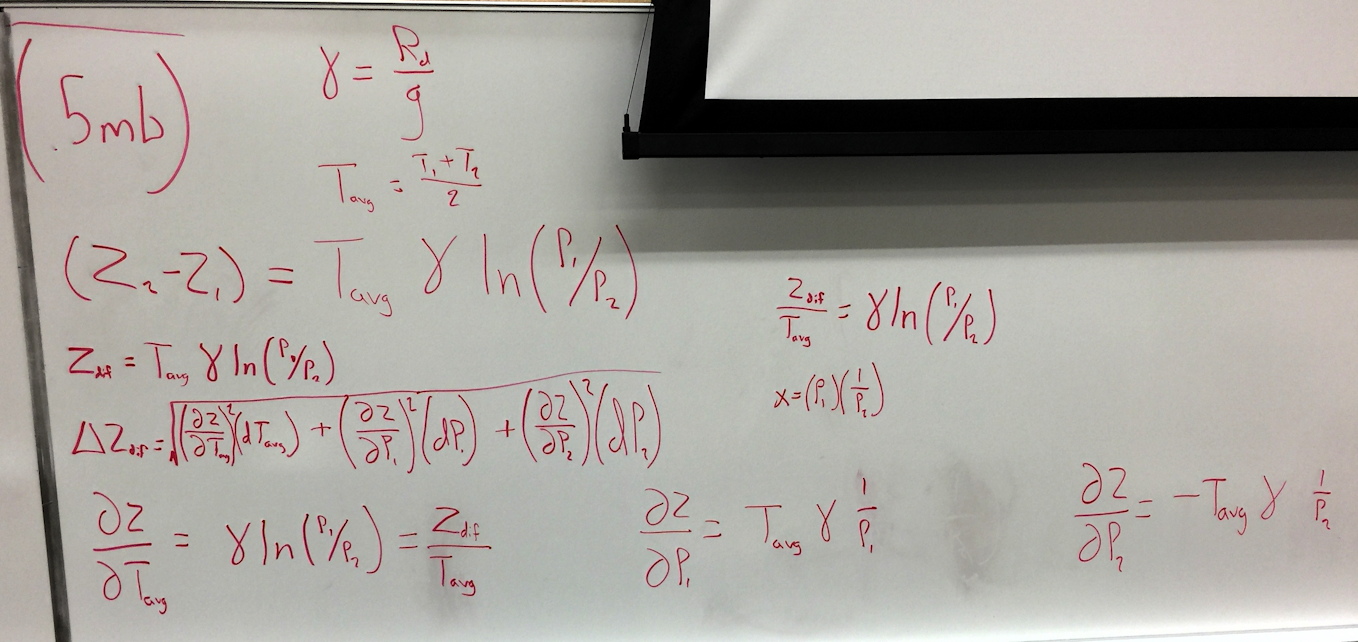
1. Theory group to work out the equations for calculating height in the building from pressure measurements (and uncertainty propagation through the equations).
 |
 |
 |
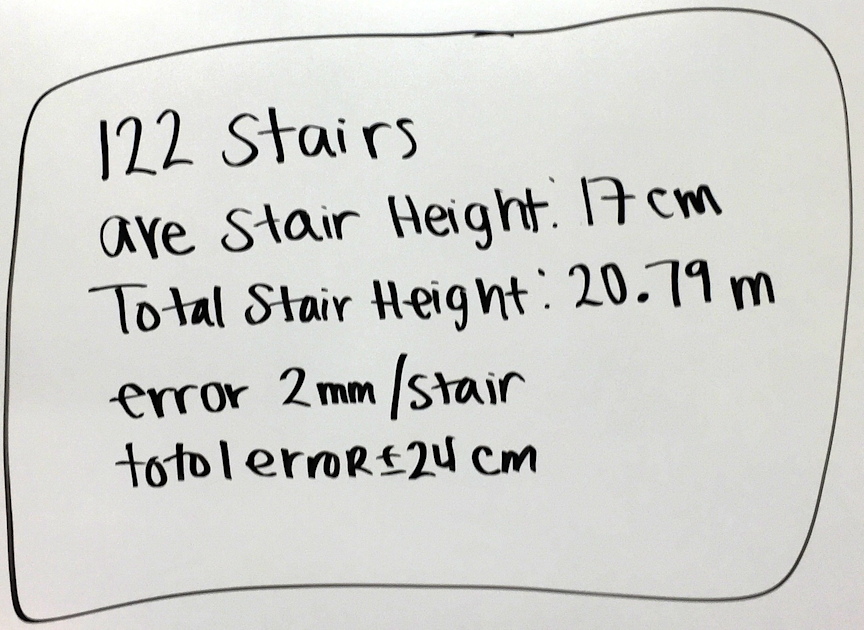
2. Actual building height group to work out the height of the building based on measurements (and uncertainty). Eraser drop group can report as well (with uncertainty).
 |
 |
 |
| Stairs: Possibly to the 4th floor rather than 5th floor? | Eraser drop schematic, to the first floor from an an initial height of? | Results of eraser height drop. |
3. Each Teensy card mentor from the Tuesday's class, and helper, need to plot time series of pressure, temperature, and dewpoint temperature, as
a function of height in the building, letting z=0 be the value at the 1st floor.
Need to plot both temperatures (from the digital sensor and the thermistor).
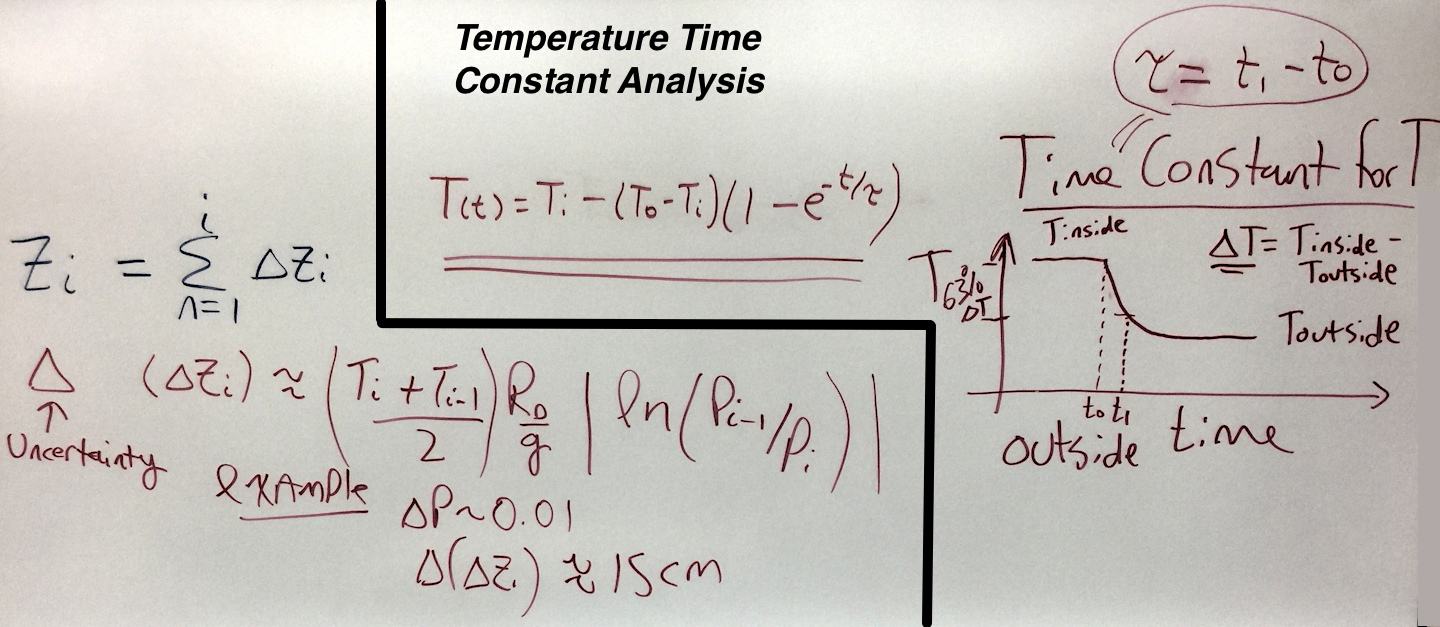
Our first measurement was outside to gain insight into the time constant of the temperature sensors.
Week 8: 7 March
Additional pressure and temperature measurements were made on the 10th of March:
a. Teensy card 4 with a fan to hopefully decrease the time constant of the temperature sensors.
b. Teensy card 3 with no fan for comparison.
Students using these can compare the time response of the sensors with and without the fan.
Here are the pressure, temperature, and relative humidity measurements from inside the building made using the
Teensy cards, 8 March 2016. On Thursday 10 March, we need to form three groups as follows:
1. Theory group to work out the equations for calculating height in the building from pressure measurements (and uncertainty propagation through the equations).
2. Actual building height group to work out the height of the building based on measurements (and uncertainty). Eraser drop group can report as well (with uncertainty).
3. Each Teensy card mentor from the Tuesday's class, and helper, need to plot time series of pressure, temperature, and dewpoint temperature, as
a function of height in the building, letting z=0 be the value at the 1st floor.
Need to plot both temperatures (from the digital sensor and the thermistor).
Our first measurement was outside to gain insight into the time constant of the temperature sensors.
We will continue to do measurements of the vertical distribution of temperature, dewpoint temperature, and pressure,
both inside the DMS building, and outside using a tethered balloon sampler.
We accomplished the tethered balloon sampling in week 7, and the data for the assignment is posted there.
This week we will work with the inside measurements, and will work out how to measure the vertical
coordinate with the pressure sensors.
This will be Assignment 3.
Related information
Thermistor calibration data (our sensor has a resistance of 100 kOhms at 25 C).
Thermistor as a temperature sensor presentation.
Analysis and circuit for thermistor operation.
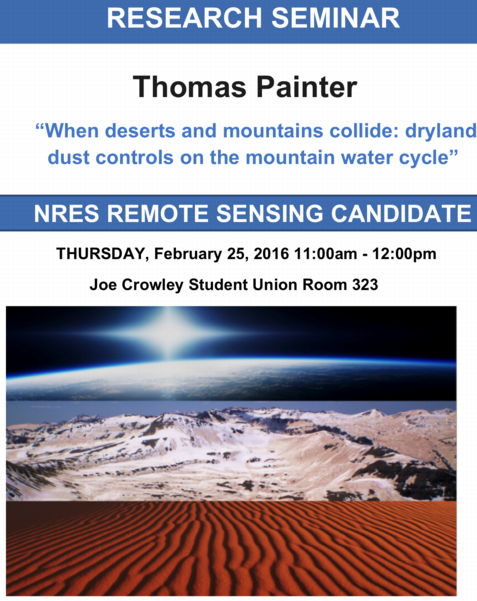
Talk on Wednesday: Click on image for larger version.

Week 7: 29 February
We will do measurements of the vertical distribution of temperature, dewpoint temperature, and pressure,
both inside the DMS building, and outside using a tethered balloon sampler.
This will be Assignment 3.
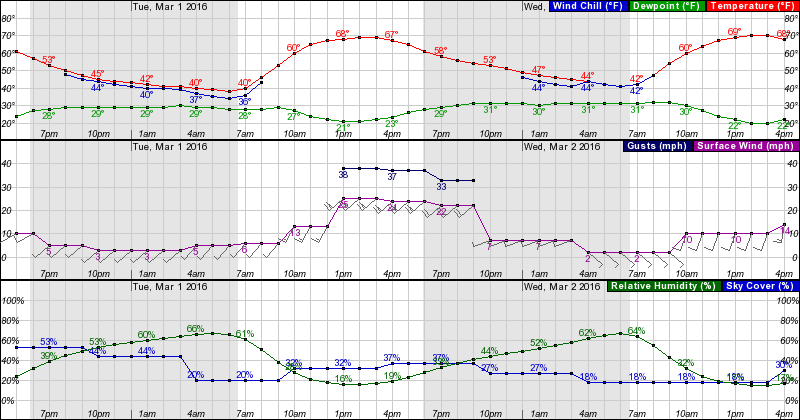
Here's a meteogram for Tuesday, indicating light winds at class time, and 20% sky cover. It is likely we will do the tethered balloon sampler measurements (by DMS) on Tuesday to take advantage of the relatively calm conditions.
These data are from the National Weather Service, look on the lower right of the page for this graph.
Measurements from the first balloon launches.
Measurements from the second balloon launches.
Measurements from the third balloon launches.
Photo of the balloon sampling on 1 March 2016
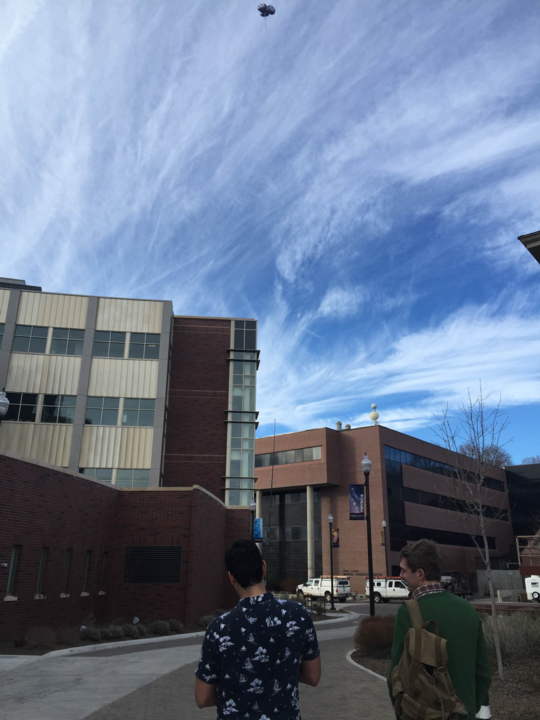
Photo of balloon sampling on 3 March 2016
Data from balloon sampling on 3 March 2016
Time lapse movie from 3 March 2016
Week 6: 22 February
Be sure to bring your questions about Assignment 2 to class.
Work on the assignment as homework as well.
You can bring questions to office hours on Wednesday as well (1 to 3 pm, RM 213 of Leifson Physics).
We will wrap up assignment 2 this week, continuing the study of error in atmospheric sensor
measurements and how it affects our ability to quantify properties of the atmosphere.
Assignment 2 has been edited for clarity and will be our focus this week.
Example with error bars.
Related Weather
Tropical cyclone Winston hits Fiji: Category 5 hurricane, central pressure 920 mb, 185 mph winds. About tropical cyclones.
Week 5: 15 February
We will continue to work on a project to study error in atmospheric sensor measurements and how it affects
our ability to quantify properties of the atmosphere.
Assignment 2 has been posted and will be our focus this week, and into next week.
Summary of Assignment 2 graphs needed (click on image for larger version):
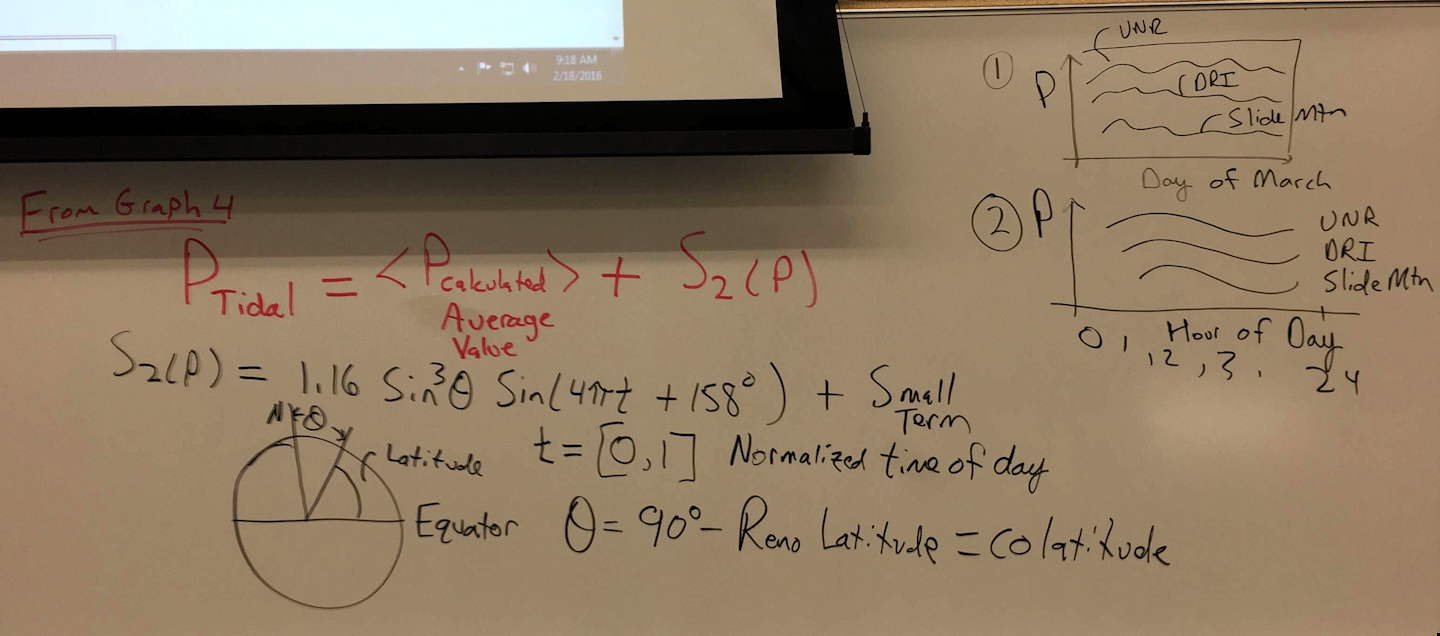

Paper on atmospheric tides from this source.
Here's our set up: brief presentation on atmospheric thermodynamics.
Week 4: 8 February
We will next work on a short project to study error in atmospheric sensor measurements and how it affects
our ability to quantify properties of the atmosphere.
Assignment 2 has been posted and will be our focus this week.
Here's our set up: brief presentation on atmospheric thermodynamics.
RELATED INFORMATION AND USEFUL TOOLS:
Campbell Scientific sensors for atmospheric science applications.
Thermal resistors (thermistors) presentation, sensor often used for temperature measurement.
NASA Worldview Satellite Imagery (true color images from the MODIS sensor on the Aqua and Terra satellites, late morning and early afternoon images).
Balloon sounding data from the University of Wyoming
Blank skew T log P graph paper.
Comet Program Meteorological Education on Skew T log P.
American Meteorological Society
Student Chapter Meeting

UNR Summer Research Opportunity for Undergraduates (click here.)

Climate/Society talk

Week 3: 1 February
We are working with the temperature lapse rate for this first assignment.
We'll continue to work with the surface based meteorological data from the DRI weather stations in our area.
This is the spreadsheet we've developed so far.
The first assignment has been posted, and will look at the difference in the nature of inversions in December and July 2015.
RELATED INFORMATION AND USEFUL TOOLS:
Campbell Scientific sensors for atmospheric science applications.
Thermal resistors (thermistors) presentation, sensor often used for temperature measurement.
NASA Worldview Satellite Imagery (true color images from the MODIS sensor on the Aqua and Terra satellites, late morning and early afternoon images).
Balloon sounding data from the University of Wyoming
Week 2: 25 January
We will work with the temperature lapse rate for this first assignment.
We'll continue to work with the surface based meteorological data from the DRI weather stations in our area.
This is the spreadsheet we've developed so far. Bring yours to class and we'll proceed from here.
As we work on data and all, please ask questions or let me know if you are not caught up with what we're doing in class.
It's vital we are all together on this.
The first assignment has been posted
Here's a link that describes why we are interested in lapse rate.
Timely, related information:
New acronyms heard during the trip to NREL
TMY=typical meteorological year; CSP=concentrating solar power; DNI=direct normal incident solar radiation
P90=conservative estimate of solar power generated by a solar array so that only 10% of values are greater, as a metric for investors.
NREL=National Renewable Energy Laboratory in Golden Colorado, solar research program.
Department of Energy Sunshot Initiative to bring increase solar power generation capacity in the US.
Some of the companies at the meeting: Wind Logics; First Solar.
GOES R satellite: Help predict solar power with a 5 minute update.
National Solar Radiation Data Base
Measurement and instrumentation data base.
Week 1: 19 January